How to edit a logo when the concept and source file differ
Updated · By LogoSketch
To work out how to edit a logo, first identify what you have permission to change and what the file actually contains. Then separate the changes you want: shape, lettering, color, layout or background. A picture of a logo and an editable construction of that logo may require different work, even when they look similar on screen.
Twelve relevant discussions informed this workflow. People had sketches, rough concepts, lettering they wanted changed, background problems or artwork they needed someone to refine. Some were creators and others were practitioners helping a client. We use those needs to organize the guide; they are not proof that one editing method works for every file.
Make a safe working copy and define the change
Keep the original file unchanged and work on a separate copy. Record who supplied it and any instructions or permissions you received. If the intended change is based on someone else's mark, font or artwork, resolve authorization before using the result. This guide does not establish rights or provide a trademark opinion.
Write a concrete edit request. For example: keep the circle, move the small rectangle to the right, change its fill, and retain the current proportions. That is easier to check than make it more modern. A lettering request should name the actual problem, such as awkward spacing or a word that becomes difficult to read at the intended placement.
For our teaching example, we drew a circle and a rounded rectangle ourselves. They are intentionally simple shapes, not a client logo or a proposed commercial identity. The request is to change one rectangle's fill while leaving its dimensions and the circle unchanged.
Inspect the contents, not just the extension
The W3C describes SVG as a language for two-dimensional graphics that can include vector shapes, images and text. This matters because an SVG filename alone does not tell you that every visible part is a separately editable vector shape. Inspect the content or ask the person supplying it what construction you are receiving.
A raster image embedded inside an SVG is still a different editing situation from the two shape elements in our example. Likewise, changing a filename does not reconstruct a picture into separate shapes. In our local check, an existing PNG could be identified as a PNG image; attempting to parse its bytes as XML failed. That is a narrow file-content demonstration, not a test of every conversion application.
If the file does not contain the editable parts you need, ask for the appropriate source or discuss a separately authorized reconstruction. Do not promise yourself that one export button will recover a missing original construction.
Test one small change before rebuilding everything
Download our original shape example and the changed-fill version. They are teaching assets made for this guide. Both contain a circle and a rectangle; the second changes the rectangle's fill attribute. You can inspect their text with a text editor without uploading anything to a service.
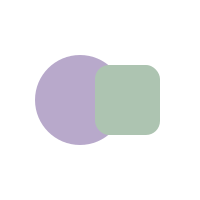
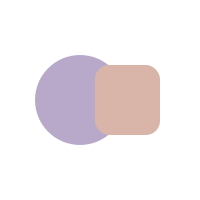
Our local XML check confirmed two shape elements in each file, the same circle attributes and rectangle geometry, and a different rectangle fill. That verifies the particular edit we describe. It does not demonstrate a live LogoSketch editor, a successful import into your preferred design program, correct font handling or a production-ready logo.
Use the same principle with your authorized artwork: choose one expected edit, make it in a working copy, and inspect the result before investing in a larger reconstruction. If you cannot select the component you need, stop and establish whether the source contains it as a separate object.
Separate shape, lettering and color decisions
Our suggested editing log gives each requested change its own row. Record the component, the intended change, what must remain unchanged and how you will review it. Use it to check a color change alongside any moved element or altered wording.
Lettering needs its own check. Record the words that should appear and the font or source information you have. If another person is doing the work, ask which lettering changes remain possible in the delivered file. Do not assume that visible text will remain ordinary editable text in every exported version.
For color, name the variant you are reviewing and the background on which you viewed it. This guide does not assign universal meanings to colors or diagnose unexpected changes between applications. If a result differs, preserve both files and the conditions under which you saw the difference before asking the supplier to investigate.
Review the intended placement
Place the working version in a mockup of its first intended use and check whether the words and distinguishing shapes are understandable to you at that size. Repeat on the backgrounds you expect to use. These are suggested review steps, not a certification of accessibility, print quality or technical compatibility.
If a production supplier will use the mark, send its requirements to the person preparing the artwork. Ask for confirmation against those requirements. We have not tested our teaching files in a print workflow, cutting system, embroidery service or third-party editor.
Keep the editable source and delivery files connected
Record which source produced each delivered variant. Give the variants descriptive names and keep the original alongside the approved working version. Our file handoff guide provides a simple checklist for that next step. If you still need to choose who will develop the artwork, start with the workflow comparison.